


How To: Universal RG6 Compression F Connector on Quad Shield Coaxial Cable
Written by Don Schultz, trueCABLE Senior Technical Advisor, Fluke Networks Copper/Fiber CCTT, BICSI INST1, INSTC, INSTF Certified
One would think that RG6 F-Connectors on coaxial cable would have been totally sorted out by now. Considering this technology has been around for decades, the process of putting on coaxial connectors should be simple. Right? Well, not quite. Ask the average installer about punctured hands, poked fingers, and other maladies. You will hear quite the earful of “war stories”. Legends about how difficult it is to terminate quad shield RG6 coaxial cable strike fear into the average person’s heart. If you look around the market, you will see many accessories to make it easier to put on the average RG-6 connector. From flaring tools to help stretch out the cable jacket so the connector can actually slide on to the cable, to tools designed to allow high leverage so the process of pushing one on does not damage your hands…or cause you to exert so much energy that you give up on the idea.
Why hasn’t anyone focused on creating a better F connector for coaxial cable to deal with this? At trueCABLE, we were wondering the same thing and set out to make this process as easy, effective, and painless as possible. Before we talk about the solution, let’s sort out some naming and clear up any confusion around acronyms. “RG” stands for “Radio Grade”. In recent years, the term “RG” has been replaced in the ANSI/TIA 568.4-D and BICSI ITSIMM documentation to be “Series 6”. However, the acronym RG has continued to stick. Therefore, we will continue to use it here, for simplicity if for no other reason. You will see Series 6 coaxial cable and associated connectors referred to as:
- RG-6
- RG-6/U
- RG6
- RG-6DS
- RG-6QS
Fear No More
ANSI/SCTE 74 2011 sets the acceptable maximum outer diameter (thickness) of coaxial cable as follows (trueCABLE’s RG-6 coaxial cable is listed for your reference as well).
| RG-6 Coaxial Cable Type | Permitted Max OD | trueCABLE Coaxial Cable |
| Dual Shield | 6.93 mm | 6.80 mm |
| Tri-Shield | 7.06 mm | No equivalent |
| Quad Shield | 7.54 mm | 7.40 mm |

Yup, that’s our new coaxial F-Connector!
Ok, so you may be asking why this universal F-Connector is able to succeed where many others have failed. Well, here’s why:

Notice the circumferential “petals” in there? That’s why.
Traditional F-Connectors rely upon a sleeve system. This means you have to jam a piece of metal between the cable outer jacket and first level braid shield. This also means you will need to break out a flaring tool in order to open up said outer jacket, potentially while cussing like a sailor while trying to force everything on. Not anymore. The petals inside this new style F-Connector “auto adjust” for different cable outside diameters. They are not only designed to complete the two conductor circuit that is found in any coaxial cable, they are springs too. Cool, huh?
Our RG6 Compression F Connector has the following qualities:
- Universal fit from dual shield to quad shield coaxial RG-6 coax cable, assuming your coaxial cable falls between 6.80 - 7.54mm outer diameter
- Easy slide on installation
- No need for flaring tools any more!
- Compression design, as recommended per the standards
- Works with any compression (crimp) tool designed for RG6 F-Connectors
- Made from nickel plated brass for best signal performance
- Not waterproof, so outdoor installations are possible but measures for waterproofing must be taken
- Tested and Certified to TIA 568.4-D CATV RG6 @ 150 feet (one connector at each end) with both dual shield and quad shield RG6 coaxial cable sold by trueCABLE
In addition to our new F-Connector, we also set about designing a reliable and strong RG6 F Connector Compression Tool. Simple in operation and durable were the design goals.
RG6 F-Connector Termination & Compression Process
Videos are great, but sometimes close-up high resolution photos are very helpful and so we will take you through the process step by step!

Using a good coaxial cable strip tool like our Cable Stripping & Cutting Tool, perform the 1/4” - 1/4” strip preparation of the cable using the RG59/6 setting on the cassette

To achieve the correct strip, the coaxial cable should be inserted and even with the end of the green tool housing.
 When turning the tool around, you will feel and hear grinding. That is the tool cutting through the first level braid shield. After the grinding stops, continue turning another 5X so the tool completes the strip process or continue turning until you start to feel grinding again

This is the 1st and 2nd level strip after the cable is removed from the tool. The first 1/4” will come off and reveal the copper conductor. The second 1/4” strip will be cable jacket only and reveal the braid shield.

A good strip!
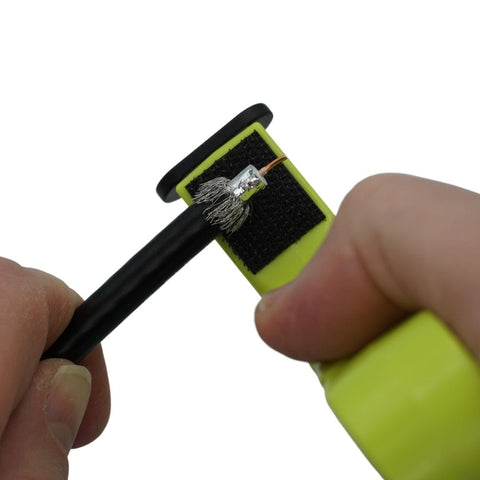
Use the velcro pad found on the tool to brush back the 1st level braid shield against the cable jacket. Make sure you get it all brushed back! This exposes the 1st level foil shield.

Had this been a dual shield coaxial RG6 cable, you would be done with cable preparation at this point. HOWEVER, since we are working with a quad shield cable you will need to remove the 1st level foil shield. Find the corner and then carefully “nip” it at the cable jacket with flush cutters.

Using flush cutters to make the “nip”.

Peel the 1st level foil shield off as shown. This exposes the 2nd level braid shield.

Brush back the 2nd level braid shield as you did before. This will expose the 2nd level foil shield (don’t remove that!).

Cable preparation complete. Time for an F-Connector! Simply slide it on.

F-Connector slid on fully. Ready for compression. How do you know it is fully inserted, however?

The white foam plastic dielectric should be even with the inside metal of the F-Connector. Not above or below…but even.

Break out your RG6 F-Connector Compression Tool and open the swing gate.

Insert the cable and F-Connector and then close the swing gate. Be sure the gate is closed! Then compress the connector with the tool until it stops.

Compression complete. The copper conductor should not extend more than 1/8” to 3/16” above the end of the F-Connector. If it does, then flush cut to shorten it. Too long of a conductor may damage equipment! Consider 1/4” the absolute maximum.

Compressed vs uncompressed F-Connector to show the difference.
You are done! If needed, you can lightly tighten the F-Connector to the equipment using a 7/16” wrench after screwing it on. Don’t over-tighten, however!
RG6 F-Connector Compression Tool Maintenance & Adjustment

As needed, apply one drop of high quality light oil to the indicated linkage points. This may be as often as every six months with heavy use, or as little as every year.

As needed, apply one drop of high quality light oil to the indicated linkage points. This may be as often as every six months with heavy use, or as little as every year.

Proper setting for typical F-Connectors, including trueCABLE’s. The “F” and line indicate where the edge of the toolhead should stop when the handle is fully compressed. This is how the tool is shipped from the factory.
Well, there you have it. We covered quite a bit of territory! First, we talked about what F-Connectors are and the challenges associated with them. Then, we covered terminating trueCABLE’s new RG6 F-Connector with our new compression tool. We finished up with how to adjust and maintain the compression tool. On top of it, we even presented a video that shows how this all works! Termination of RG6 compression connectors is now a hassle-free and less injury prone task. This refined system will greatly increase your speed and cut way back on frustration.
HAPPY NETWORKING!
trueCABLE presents the information on our website, including the “Cable Academy” blog and live chat support, as a service to our customers and other visitors to our website subject to our website terms and conditions. While the information on this website is about data networking and electrical issues, it is not professional advice and any reliance on such material is at your own risk.


