


Service Loops: Discovering Purpose, Placement, and Preparation
Written by Don Schultz, trueCABLE Senior Technical Advisor, Fluke Networks Copper/Fiber CCTT, BICSI INST1, INSTC, INSTF Certified
I have a common saying (I like to call it a “truism”) learned from hard earned experience:
"The most expensive kind of cable in the world, on a per foot basis, is the one that is 1” too short."
Hopefully you have not discovered the same “truism” like I did! Essentially, having enough cable to work with and move around if needed is simply prudent planning. However, this important detail seems to get skipped all too often in communication cabling installations (structured cabling systems). In this blog we will specifically discuss this excess cable in the context of copper twisted pair Category Ethernet cable. Category is irrelevant when we are talking about excess cable. Whether Cat5e, Cat6, or Cat6A the same rules apply. The excess is called a service loop and also called service slack, and we will use the terms interchangeably. Note that fiber optic cable and coaxial cable will typically follow similar rules for excess cable.
What is a service loop in wiring?
Service loops are excess cable (slack) that is designed to be in addition to any cable needed for the actual planned drop (run) length and terminations. Service slack is found at both ends of the permanent link in a structured cabling system. A common misnomer is that service slack is to be for the “oops factor” that may be encountered during any installation. This is not true. Service loops are planned excess, not excess specifically planned for any mistakes. If you believe you may have some length-related mistakes that may occur due to uncertainty, add in additional “oops factor” cable length to your calculations. You can always cut off any excess cable not needed, but you cannot add it back easily (or at all).
What is the purpose of using a service loop in wiring?
Service loops are designed to facilitate…
- Adds
- Moves
- Changes
…to your communications cabling system. For example, if your LAN equipment needs to change locations inside of your telecommunications closet (called a Telecommunications Room or TR, formally) how will you go about this if there is no extra cabling to reach it?
Of course service slack will help cover for any unplanned and unexpected issues such as cable damage or miscalculated run lengths. What if you need to re-terminate your cable to replace a damaged or defective keystone jack and don’t have the extra cable to do it? The last thing you want to do is re-run the entire cable for a straightforward keystone jack replacement. The same thing applies to the other end of the permanent link: What if a user damages a keystone jack in a wall and you need to replace it but don’t have the extra cable to allow it?
Where do you install a service loop?
As noted earlier, service loops are found at both ends of the permanent link. That means in two locations, which come in two primary forms:
- Telecom room to telecom room permanent link (usually for backbone runs)
- Telecom room or structured media enclosure to remote wall jack(s) (traditional permanent link known as rack to jack)
Where you typically find residential OR commercial service loops at the outlet:

Cable termination for a living room keystone jack. Note the planned cut point and excess cable coming out of the wall. The excess will need to be stored in the wall.
Where you typically find residential service loops at the media enclosure:

The other end of the permanent link, running into a structured media enclosure and finally to a patch panel.

Service slack stored above the structured media enclosure in a residence. The media enclosure is mounted under the basement stairs.
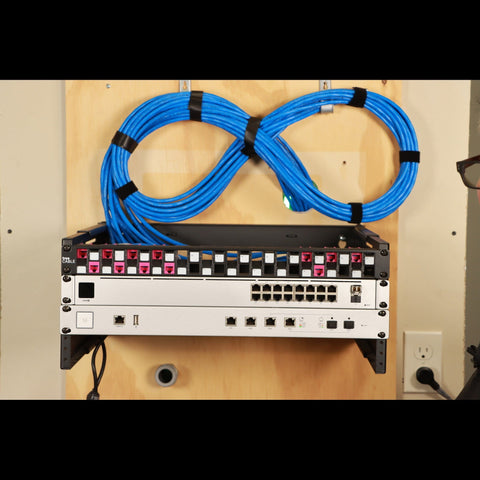
Where you typically find commercial building service loops in the telecommunications room:

Telecommunications room in a commercial building. The conduit is bringing in the drops to the ladder rack and the service loops are stored and attached to the ladder rack. Note the figure “8” pattern.

The cable drops down from the ladder rack and terminates to the back of the rack mounted patch panel.
There are some “in between” situations where the service loop is stored above a wall mounted rack unit. This type of installation is seen in small business and high end residential setups. Essentially the idea is the same, the cable is just stored a bit differently.
Service slack stored above a 4U wall mount rack unit. The service loop is supported on two J-hooks attached to the same backboard that the rack unit is. Again, note the figure “8” pattern.
What are the steps required to create a proper service loop?
Installing a service loop is straightforward, assuming you follow some basic rules. The rules will differ depending on:
- Individual installation environment where mitigations must be taken for other technical factors
- Customer contractual obligations
- Industry standards and best practices (ANSI/TIA 570-D, ANSI/TIA 568-0.E or BICSI ICT Guidelines)
If you are installing Ethernet for a customer, then the customer is the Authority Having Jurisdiction (AHJ) and you should install the service loops per your contractual obligations.
In the absence of contractual obligations, or if YOU are the AHJ, then you should follow industry standards and guidelines with adjustments as absolutely necessary to mitigate length issues that may introduce problems such as being overlength or overlength for the ambient temperature. See Calculating Ethernet Cable Overall Channel Length for Success and also Temperature's Effect on Ethernet Cable Length for detail on how lengths permitted will depend on how you construct your overall channel and how ambient temperatures can really affect how much service slack you can plan for! Nothing in life is straightforward, is it?
Guidance from trueCABLE:
- Use hook and loop straps (aka Velcro) to cinch your cable bundles. Avoid nylon ties as they focus too much pressure on the cable jacket and may cause jacket damage or alien crosstalk performance issues.
- DO NOT use a cable comb to straighten out and “make pretty” the cable bundle. Installation experiences in the field demonstrate this may increase alien crosstalk issues and can cause the same cable to bear the weight of the bundle in too many places which can cause performance issues over time.
- Always store service slack at the network enclosure or rack in a figure “8” pattern, using velcro straps to create the figure “8” pattern.
- When creating your figure “8” do not violate the minimum bend radius for your cable. Please see Obey the Bend: Calculating Wire Bend Radius. Note that if the inside diameter of the bends on both sides of the figure “8” do not get tighter than 5” in diameter you can skip the calculations.
- Use two or more J-hooks specifically designed for communications cable on either side of the figure “8” to support your service slack if the slack is mounted on a backboard. Otherwise, store the slack on a ladder rack.
Guidance from the industry standards:
For residential installations, per ANSI/TIA 570-D:
- Leave at least 3 feet of cable slack at the media enclosure box for adds and changes
- Leave at least 8 inches of cable slack and store excess in the wall (or outlet box) at each outlet for copper cable
- U/UTP Ethernet cable stored at the media enclosure should be in a figure “8” pattern*
For commercial installations, per ANSI/TIA 568.0-E and BICSI ITSIMM 8th Edition:
- In the telecommunications room, pull in enough excess cable to reach the farthest corner of the room plus floor to ceiling from where the cable enters the room
- At remote telecommunications outlets leave 1.6 feet (about 20 inches) to allow for 1 foot left over after termination. Store excess in the wall cavity or inside the outlet box.
- U/UTP Ethernet cable stored on the ladder rack or other fixture should be in a figure “8” pattern, never coiled*
* The figure “8” pattern is designed to prevent the Ethernet cable from interfering with itself (called ANEXT or alien crosstalk) and to prevent the cable from picking up radio frequency interference (RFI). U/UTP Ethernet is unshielded Ethernet.
What are some common mistakes to avoid when installing a service loop?
The most common errors involving service loops are:
- Not figuring a service loop into your calculations to begin with!
- Counting on your service loop to mitigate any length miscalculations you might have made. Service loops are planned, not incidental.
- Turning and storing the service loop in a circular coil pattern.
- Creating service loops with nylon ties.
- Failure to take into account ambient temperatures when adding in the service loop to the actual drop length. This typically occurs in outdoor above ground installations, or installations in factories. You may need to reduce your service loop length to be sure you don’t go over length for ambient temperature or over the maximum 295 feet permitted for permanent links. If the cable is exposed to ambient temperatures of 72℉ or less all along its length then you need not worry about temperature derating.
So, there you have it! Service loops explained in detail. This often misunderstood subject is a source of angst for many installers and hopefully we helped clarify how and where service loops are used. With that in mind…
HAPPY NETWORKING!
trueCABLE presents the information on our website, including the “Cable Academy” blog and live chat support, as a service to our customers and other visitors to our website subject to our website terms and conditions. While the information on this website is about data networking and electrical issues, it is not professional advice and any reliance on such material is at your own risk.


