


How To: trueCABLE 3D Stagger Unshielded 24 Port 1U Toolless Patch Panel
Written by Don Schultz, trueCABLE Senior Technical Advisor, Fluke Networks Copper/Fiber CCTT, BICSI INST1, INSTC, INSTF Certified
Unshielded Ethernet cable is as popular as beer on a picnic. Why? The answer is straightforward in that unshielded copper twisted pair Ethernet is:
- Less expensive
- Less difficult to work with
- Does not require proper bonding to ground
Of course shielded Ethernet cable should be used when the environment demands it, and if you take a look at Shielded vs. Unshielded Cable you will get a good idea of when and where to use shielded cable. The fact is most installations do not require shielded Ethernet cable, and therefore unshielded Ethernet cable is the most installed type.
Considering that most installations don’t need shielded Ethernet cable, there is a trouble spot that professional installers have had to deal with for quite some time: Cat6 and Cat6A driven to high speed such as 10Gb/s and ANEXT (alien crosstalk) with unshielded Ethernet cable. It is well-known in the ICT industry that using shielded Ethernet cable with shielded hardware and patch panels is the absolute guaranteed way of avoiding cable-to-cable crosstalk issues. I provide a very good explanation about alien crosstalk (ANEXT) in When Aliens Attack! Avoiding Ethernet Alien Crosstalk. In short, alien crosstalk is outside interference coming into your Ethernet cable from another Ethernet cable. It is not a good thing.
ANEXT occurs at the patch panel too, not just along the cable bundle! Mini EMI “bubbles” form around each termination at the patch panel, and you don’t want them overlapping. Yikes.

That said, running or making use of existing unshielded Ethernet may be the only option for some installations. A great example is many IT professionals have limited budgets yet have very large Ethernet LAN installations that make use of unshielded Cat6 Ethernet. These large installations need to leverage ever higher speed demands, but to replace the existing cable with shielded Cat6A would be cost prohibitive. A common scenario is a need to drive “legacy” unshielded Cat6 Ethernet to 10Gb/s (which is allowed per ANSI/TIA 568 assuming you obey some rules). At the same time residential installations are getting faster too, but rarely need to use shielded Ethernet cable and the challenges that come along with installing it. It is not uncommon to find 2.5Gb/s, 5Gb/s, and even 10Gb/s network gear (routers and switches) in residential spaces thanks to the NBASE-T protocol. Newer computer motherboards commonly come with 2.5Gb/s and 5Gb/s NICs built in.
The problem is, nearly all unshielded patch panels are designed in such a way as to cause ANEXT issues with high network bandwidths at 350 MHz and above--which means Cat6 and Cat6A operating at 5Gb/s and 10Gb/s. These older patch panels were designed for a different era and lower speeds. This issue is especially acute with 110 punch down IDC patch panels. This is why you never see an unshielded Cat6A version of one.
Below is a short introductory video. Please watch it and continue reading as there is much more written information and another video further down in this blog.
First, a bit about patch panels. You can skip this section if you already know what they are used for…
Patch Panel Overview
In general, patch panels serve as the central starting point for your communications and A/V cabling. It typically is mounted with your network switching gear out of the way and out of sight. Normally, residential patch panels and switching gear are mounted in an “A/V closet” or basement on a plywood backboard. In a commercial business, this type of gear not only needs to be out of sight, but protected from unauthorized hands--a locked TR (telecommunications room).
When it comes to termination of solid copper Ethernet cable, the best style of termination is known as IDC (Insulation Displacement Contact). This means keystone jacks, essentially. For an in-depth analysis of why IDC terminations are far superior to any other please read Terminating Pass-Through RJ45 Connectors onto Solid Copper Ethernet Cable -- A Really Bad Idea?
Toolless keystone modular patch panels allow keystone jacks to be simply terminated and then snapped in. Another nice attribute of modular keystone patch panels is they are typically Category agnostic. The keystone jacks and Ethernet cable set the Category. Pretty cool, right?
This is all great, but the “gotcha” is you will run into ANEXT issues right at the patch panel using Cat6 or Cat6A at 5 Gb/s and 10Gb/s with unshielded patch panels and cable. For that, you will need something a bit more special--a 3D stagger Cat6A Component Rated patch panel.

24 three dimensionally staggered ports, Component Rated for Cat6A!
3 Dimensional Stagger Patch Panel? Just how does that stop ANEXT?
Our 3D staggered Cat6A Component Rated unshielded patch panel was scientifically designed in a laboratory to suppress alien crosstalk by staggering the terminations into a 3D pattern which offsets those pesky EMI bubbles. Here is a rather crude (but best we could do) demonstration of that:

The EMI balloon bubbles are no longer “squished” together, which means terminations are not encroaching upon each other. The top balloon is also off-set to the rear.

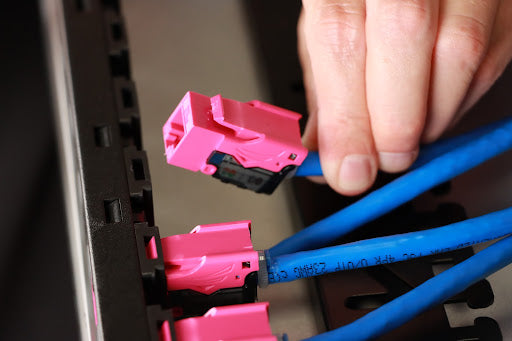
Real-life example of the 3D stagger pattern
So, now you know all the benefits of using this specially designed patch panel! How about installing it? Well, here you go!
How to Install the trueCABLE 3D Stagger 24 Port 1U Unshielded Patch Panel
Stating the obvious, our 3D stagger patch panel accommodates 24 keystones.
These keystones may be:
- Unshielded Ethernet keystones (all Categories)
- Blank fillers (black ones look best!)
- A/V keystones of various types (use caution*)
* 12 of the 24 keystone ports are recessed. The recessed ports may not allow A/V cables to plug into your A/V keystones due to width constraints. For example, many HDMI connectors are quite wide--wider than the width of a keystone jack. You can get the HDMI keystone snapped in with no issue, but the cable you intend to plug in to the coupler may not fit into the recess.
This patch panel is not designed for shielded Ethernet cable or hardware. If you need to mix and match shielded and unshielded Ethernet keystones and cable you should strongly consider our 24 Port Shielded Toolless Modular Patch Panel.
Our unshielded patch panel is 19” and uses 1 Rack Unit (1U) of space. This means you will require one of three methods to mount it:
- Traditional seven foot tall telecommunications rack (typically seen only in businesses)
- Wall mount rack. This is a 1U to 10U or more rack that mounts directly to a backboard on your wall. These wall mount racks can also be floor-bound on caster wheels. This is typically seen in small businesses or advanced residential setups. Use of a ¾” plywood backboard is recommended.
- Wall mount bracket. A wall mount bracket will typically come in 1U to 4U sizes and mount vertically. Your patch panel will mount in a vertical position, and the rest of your network equipment will likely be mounted vertically as well. Use of a ¾” plywood backboard is also recommended.
Included in the package:
- Unshielded keystone panel
- Snap-on cable management bar
- Instructions
- 24 nylon ties
Note that these items are not included:
- Rack screws. Use the screws and/or cage nuts that came with your rack. You can likely find extra hardware for your rack online if you need more than what was provided.

Patch panel, management bar, and nylon ties. Instructions not shown.
If you elect to use hook and loop (aka Velcro) straps, there are cut out provisions for those too. Our trueCABLE hook and loop straps are not included.
Installation Guidelines for Category and Bandwidth
A topic frequently neglected by modular keystone patch panel manufacturers is a discussion around what NOT to install in your patch panel.
Here is a handy chart for your reference!

For how to dress Ethernet cable into your patch panel, please see How to: Dressing Ethernet Cables into Patch Panels.
Cable Management & Service Slack
It is important to note that your Ethernet cable coming into the rear of the patch panel should be longer than it needs to be. This is called “service slack”. The idea is if you need to re-terminate keystones or even move the patch panel you will have enough slack to do it. Unshielded Ethernet cable should be turned into “figure 8” service loops. Shielded Ethernet cable can be turned into a circular pattern if desired. You also need additional slack for the termination process itself. How long? Well, that depends on the installation.
Commercial installations should have, per BICSI and ANSI/TIA recommendations, enough service slack to reach the furthest corner or your TR plus bottom to top of the backboard. Most TRs are 16 x 16 feet and 8 feet for the backboard height. This means 24 feet of service slack, assuming you have a 16 x 16 foot TR. The slack should be coiled into a “circle 8” pattern (if unshielded cable) to avoid EMI/RFI issues. Store on the ladder rack above the rack.
Residential installations should have, per BICSI and ANSI/TIA recommendations, enough service slack to reach from the top to the bottom of the media enclosure (if one is being used). A media enclosure is not strictly necessary, so if you are not using one trueCABLE recommends 2 feet for termination and 8 feet extra cable, which is 10 feet. Again, the slack should be coiled into a “circle 8” pattern (if unshielded cable) to avoid EMI/RFI issues. Store in the best location (like above or attached to your backboard).

Figure 8 pattern service slack in a residential environment. The rack is a wall mounted unit that is 4U in size.
Dealing with keystone jack insertion and removal
For the professional installer, keystone insertion and removal is straightforward. The only advice we would impart is removal of the cable management bar during the insertion process will make your work a bit smoother. You can re-attach the management bar when ready to secure your cabling for strain relief.
For novices, installation and especially removal of keystone jacks can be a bit daunting until you get the hang of it. Well, unless you are here and seeing pictures with explanations about how to do it!
Note that keystone jacks have a fulcrum point and a plastic latch. The fulcrum looks like this:

“Fulcrum” pointed out. It is on the opposite side of the jack from the latch.
The fulcrum should go down when inserting a keystone into the patch panel. Insert the keystone at a near 30 degree angle and use the fulcrum to “grab” onto the bottom of the keystone port. Then use the fulcrum as a lever when you swing the keystone upward to snap the latch into place.
Latch on top of jack shown. This is the angle to begin insertion of the keystone.
The latch should always be up.

Fulcrum being used as a lever. Almost inserted and secured!

Done!

Note that it may be necessary to use a precision screwdriver to depress the latch slightly during insertion--especially with new keystones and patch panels. They can be a tight fit!
For keystone removal, simply reverse the process. It will be absolutely necessary to depress the top latch of the keystone jack to release it. Be careful not to gouge or cut yourself during this process. I have done it. It hurts.
So, there you have it. Our 3D stagger unshielded toolless keystone patch panel fully explained. Many homeowners and small businesses think that patch panels are not needed or for “big business” only. This is not only not true, it is the quickest way to a poorly performing installation. With that said…
HAPPY NETWORKING!
trueCABLE presents the information on our website, including the “Cable Academy” blog and live chat support, as a service to our customers and other visitors to our website subject to our website terms and conditions. While the information on this website is about data networking and electrical issues, it is not professional advice and any reliance on such material is at your own risk.


