


No products in the cart.
Payment methods accepted
Unsure what Ethernet cable you need?
Look no further than our Ethernet Cable Finder. Answer a couple of questions and let trueBOT guide you to the perfect cable for any situation.
Still have questions? Check out our in-depth blogs, insightful white papers, and instructional videos on all things Ethernet cable and low voltage supplies.

Read: The Difference Between Cat6 vs Cat6A Ethernet Cable

Understand: Selecting the Correct Outdoor Ethernet Cable
Time to find coaxial cable and connectors for your install? Well, you are in the right spot!Check out our in-depth blogs, white papers, and instructional videos about everything going on in the low voltage industry and one of the best sources for coaxial information.
Have questions? Our networking experts have the answers!Check out our Cable Academy. for more information.

Read: The Difference Between Dual Shield vs Quad Shield Coaxial Cable
Understand: How To: Universal RG6 Compression F Connector on Quad Shield Coaxial Cable
Fiber Optic expertise at your fingertips.
Looking to deepen your understanding of fiber optic technology? Look no further than trueCABLE's Cable Academy. Our extensive collection of blogs, masterfully crafted by industry experts, offers a wealth of invaluable insights into the world of fiber optic cabling.
Have questions? Our networking experts have the answers.Check out our Cable Academy. for more information.
Read: Fiber Optic Splicing: Examining the Factors that Affect Splice Performance
Understand: Using Fiber Optics to Extend Your Ethernet Network Beyond Copper's Limits
Effortless cable management. Learn how we do it.
Low-voltage tools and accessories should keep your networking installations clean and organized. trueCABLE has a variety of high quality cable management tools, accessories and informative blogs for all your installation needs.
Check out our Cable Academy today and expand your knowledge.
Read: Copper Fabric Strips for Bonding Shielded Ethernet Cable
Understand: When Aliens Attack! Avoiding Ethernet Alien Crosstalk

Written by Don Schultz, trueCABLE Senior Technical Advisor, Fluke Networks Copper/Fiber CCTT, BICSI INST1, INSTC, INSTF Certified
It is rare to actually need shielded Ethernet cable in a residential setting. Many DIY installers (homeowners) have a perception that shielded Ethernet is “better”. After all, wouldn’t shielded be somehow better than unshielded Ethernet? Well, oftentimes the answer is “no”. Shielded Ethernet does not make your cable any faster. The shielding is designed to mitigate EMI/RFI interference or potential ESD discharges that you know you need to avoid. That said, there are legitimate circumstances for the use of shielded Ethernet cable in a residential environment and they are covered in Ethernet Cable Shielding Types as well as Top 2 Things to Consider When Running Ethernet and Power Cable.
The two most common scenarios where shielded Ethernet cable is recommended in a residential installation are:
So, let’s assume you decide on using shielded Ethernet cable inside or outside your home due to your environmental requirements. You may need a fully shielded installation where all of your cable runs (called drops) must be shielded or more likely you are in a situation where only a few of your drops must be shielded and the rest can be unshielded. So be it, but even if only a single Ethernet cable drop is shielded then it must be bonded to ground in order to function properly.
The problem is most residential installers are at a total loss when it comes to grounding shielded cable. It is often a source of great anxiety. Even worse, you may have some incorrect preconceived notions about what to do and the right way to do it. Therefore, the focus of this blog is shielded cable grounding (more appropriately referred to as bonding your shielded Ethernet cable to ground). You want to safely channel EMI/RFI or ESD to your AC ground system.
Since residential installations don’t typically have a formal bonding infrastructure to bond your shielded Ethernet installation to (like in a commercial building) you likely won’t have to worry about bonding ladder racks, cable tray, metallic conduit, and equipment racks. The main thing you will have to worry about is bonding your Ethernet cable shields with the help of shielded connection hardware and shielded patch panels to ground.
This blog will cover multiple methods of getting from A to B:
At the end of the blog we will cover some common questions and answers that come up. Buckle up, as this will be a detailed blog with a great deal of information and three videos! I feel the need to talk about bonding and grounding first, just for those who need or desire a more in depth explanation about what these terms really mean.
This blog will make more sense if we cover some basic terms. There is a large amount of misinformation and confusion about bonding and grounding of anything--not just Ethernet cable shields. Let’s take some information from another blog I wrote about Commercial Bonding and Grounding of Ethernet Cable Systems. The same concepts apply, but on a smaller scale. I recommend you read the commercial blog if you have a moment. Here are some snippets from that blog:
Nope. They are highly related, though. In fact, one is sort of useless without the other. That is why you see the terms right beside each other when discussing this topic.
People get the terms “bonding” and “grounding” all confused and mixed up. We need to separate the two highly related, but essentially different, terms.
But, here is a hint:
When installing shielded Ethernet cable, you bond the Ethernet cable shields (and associated shielded hardware) to your existing AC ground.
Generally, the term bonding is the process of establishing a low resistance electrical path from one conductive object to another so that unwanted voltage has a path to ground in adverse events such as:
So, bonding is establishing a path to your existing AC ground. Getting super technical about it, for Ethernet cable shields, that path must be 100 milliohm (0.1 ohm) or less. Ohms are a measure of resistance.
Grounding is also referred to as “earthing”. They mean the same thing. Conceptually, grounding is to establish a zero (0) volt reference potential to earth. The ground is between the earth itself and the AC electrical system inside your house. Its purpose is to provide an intentional path for fault current, and provide a path for ESD to drain off to. The idea is to equalize the earth’s potential with the electrical system potential, and all equipment or enclosures that are part of that system. Ground rods (called ground electrodes) and GECs (Ground Electrode Conductors) are used for this purpose.
Ok, so with the background information out of the way we will talk about how to actually get this accomplished.
First up, the easy way. Please watch this video.
If using truePLUG is somehow not suitable for your environment or you need to go a different direction, you can rig up something in a more DIY fashion. For that, we have another example. Now, please watch this video.
In order to bring all of this together, I have another video that will cover hybrid Ethernet installations where shielded and unshielded runs are mixed together (not uncommon). I really do recommend watching this too! This involves the use of our 24 port shielded modular keystone patch panel (multimedia patch panel).
Video format is great to watch but for those who need more detail and/or want to see detailed still photos with diagrams please continue reading!
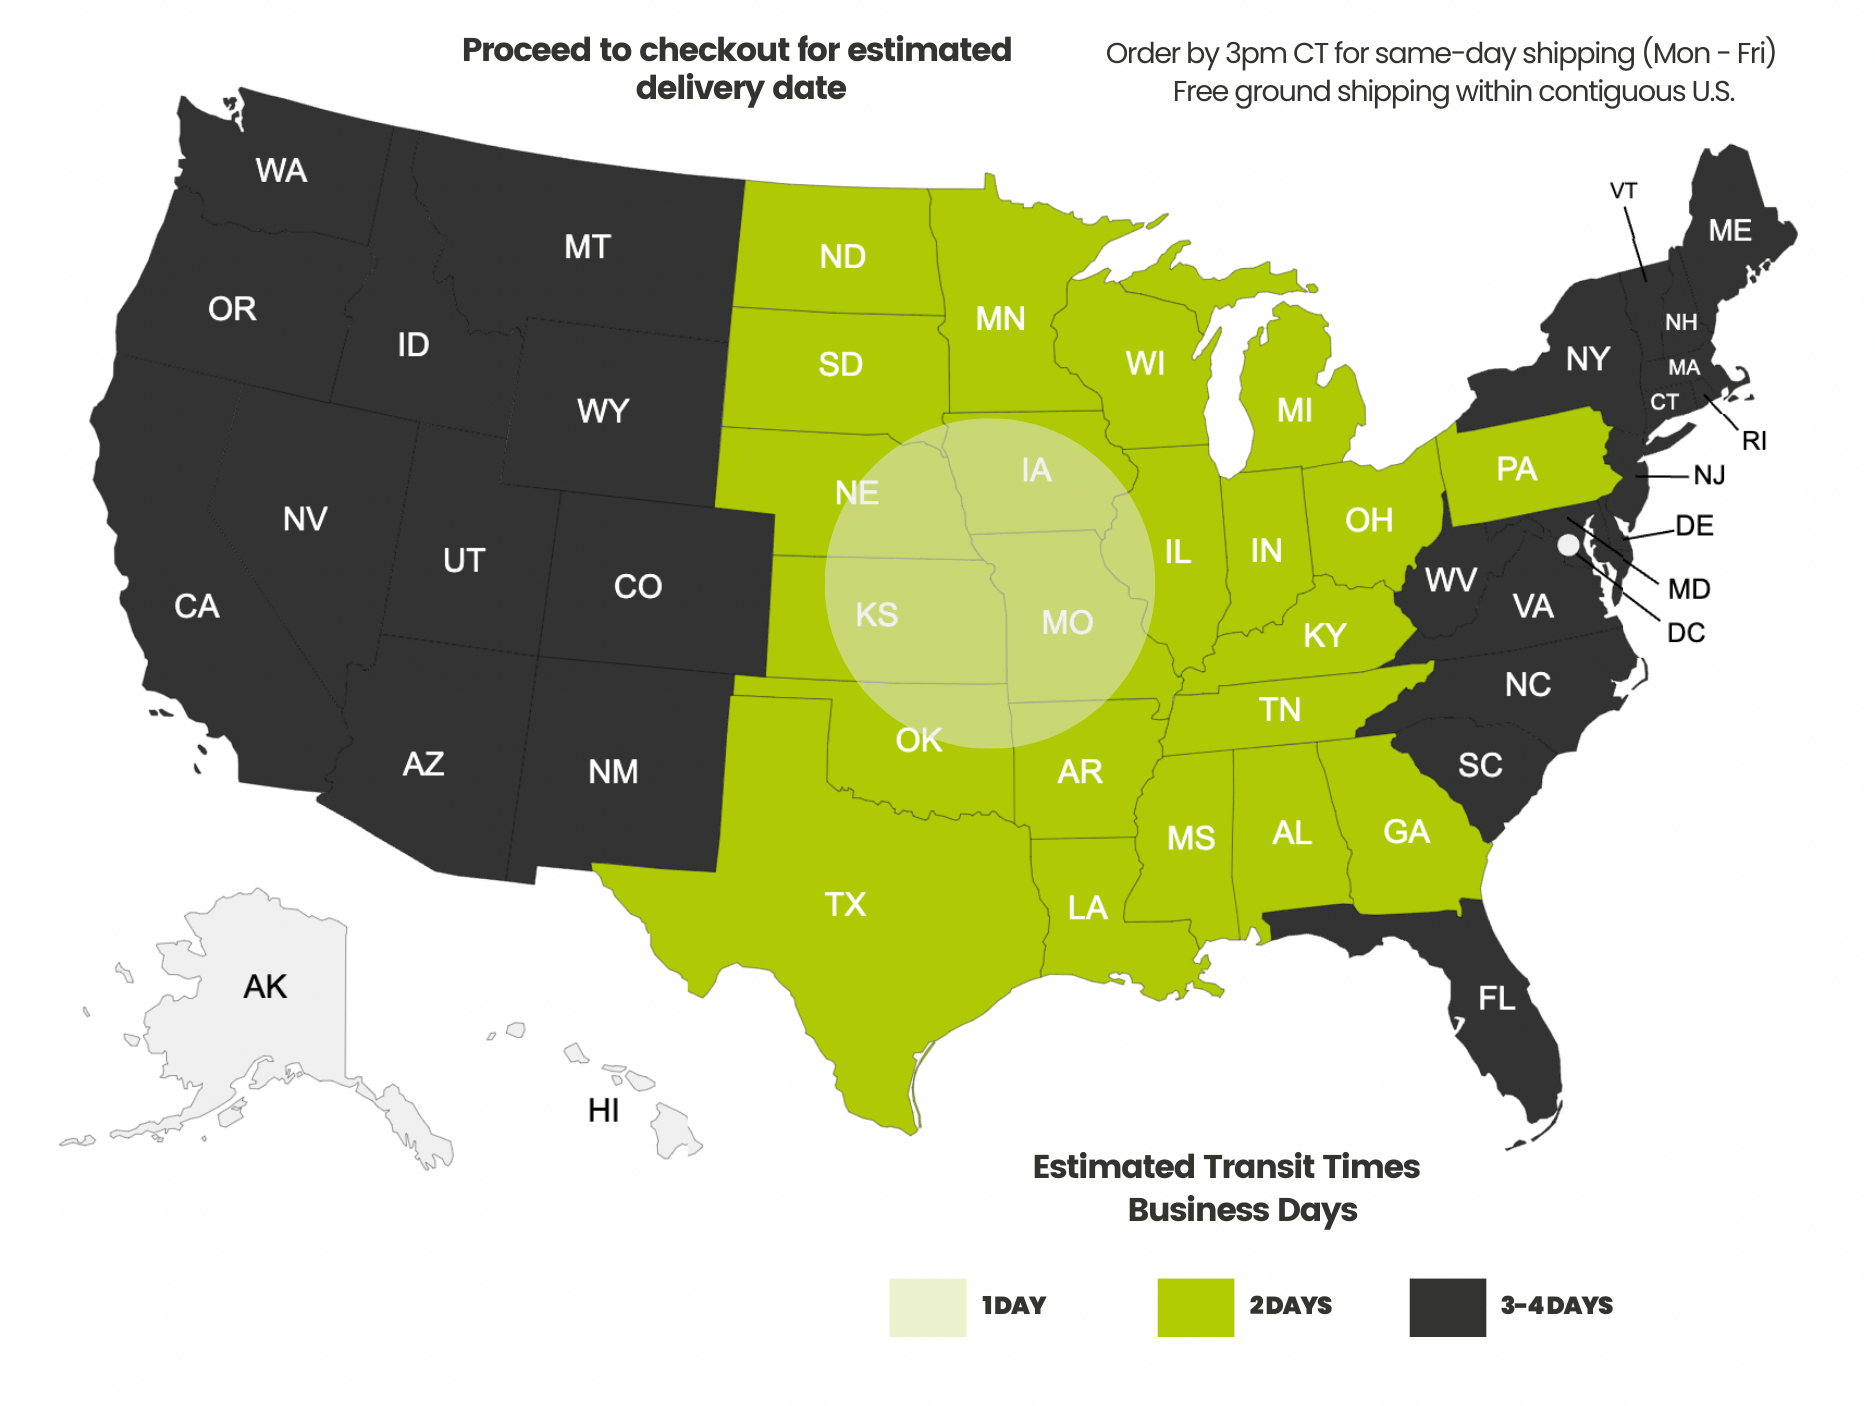
It is important to note that you will not be able to bond your Ethernet cable shields to ground without shielded hardware of some kind. Aside from needing shielded hardware like shielded keystone jacks it is strongly recommended to use a shielded patch panel to make the process a whole lot easier. We talk about shielded patch panels and how to bond them to ground further below.
 Did you know that once your cable shield is electrically bonded to the keystone jack the outside metal of the keystone jack becomes part of the cable shield and drain path? When the shielded keystone is snapped into a shielded patch panel the bond continues to the panel. Now they all function as a unit. Pretty cool, huh?
trueCABLE sells a variation of shielded cable called F/UTP. That means the cable has an overall foil shield and the individual pairs are not shielded. In addition to that foil shield there is a drain wire (tinned copper wire) that makes contact with the cable shield. This cable comes in indoor and outdoor varieties and in multiple categories such as Cat5e, Cat6, and Cat6A. The drain wire helps you bond your cable shield to the connection hardware. Here are two examples of how to prepare your shielded Ethernet cable for bonding to shielded keystone jacks:
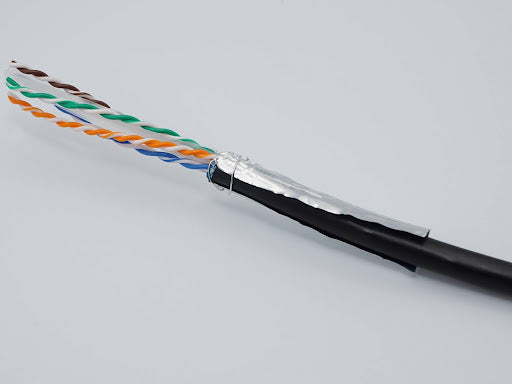
Shielded Ethernet cable. Cable shield folded backwards and the drain wire wrapped around the shield.
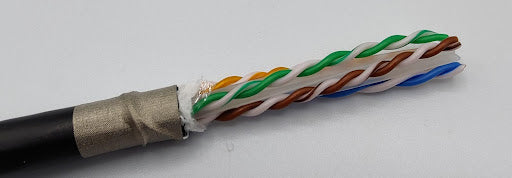
This shielded Ethernet cable has had the foil shield removed, but the drain wire is tacked down to the jacket with copper fabric conductive strips called CUStrips.
The copper fabric strips make bonding super easy and trueCABLE recommends them. Learn more in How To: Copper Fabric Strips for Bonding Shielded Ethernet Cable.
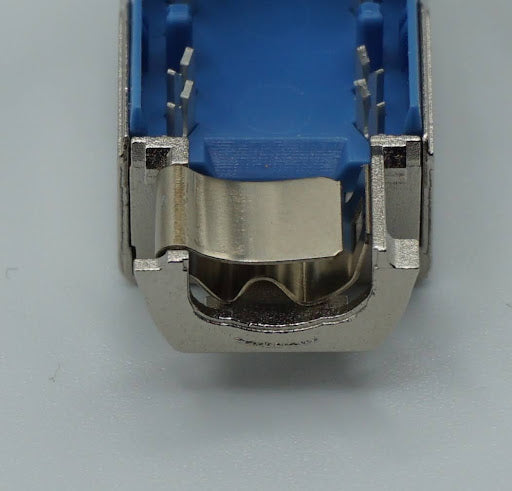
Rear of shielded tool-less keystone jack showing bond leaf spring. The cable shield and drain wire (or copper fabric strip) should make contact with this to establish a good electrical bond with the keystone jack.

Once the keystone is closed, the cable shield is now bonded. Best practice is to bond BOTH ends of the cable shield.
Once your cable shield has been properly electrically bonded to your termination hardware (shielded keystone for example) you will need to continue that bond. How do you do that? Well, there are three ways depending on your equipment and environment:
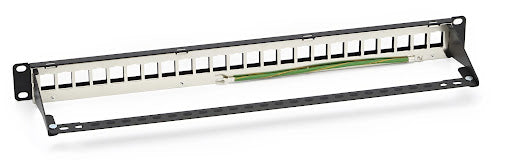
Shielded tool-less keystone patch panel. Stock bond wire attached. The stock bond wire is used for bonding to a rack busbar (RBB) or in some cases the rack frame metal itself, which can be replaced with a longer bonding conductor.
What is a properly grounded Ethernet switch? Basically any Ethernet switch which uses a three prong power cord. 19-inch rack mount switches with their own AC/DC internal power supplies fit the bill. Unfortunately, most residential Ethernet switches use a DC power supply and may not have any provision for a “ground wire” on the back.
An Ethernet switch powered via an external two prong AC/DC adapter (wall wart) is NOT properly grounded! It cannot serve as the path to ground for your Ethernet cable shield. In this case, you MUST separately bond your shielded patch panel to ground with a “ground wire”. Which means, of course, you have to use a shielded patch panel regardless. You may not have expected that.
First and foremost, you need to be sure your AC electrical system is up to the task. What this means is your AC electrical system must be properly earth grounded and up to code. Any 3 prong AC outlet must be properly wired to a good ground circuit. This can be checked with a simple 3 prong outlet tester. If you get anything other than “CORRECT” on the outlet tester you should stop and consult a qualified electrician!
Second, do not pound in a ground rod in an attempt to create your own ground separate from your AC system ground. This might seem like a good idea, but you will risk creating what is known as a ground loop, which is very bad for your electrical equipment and in rare cases a safety hazard.
If you have extremely old electrical wiring with no earth ground of any kind then you may have no alternative but to install your own earth ground. If you are in that situation, you should STOP. Consult a qualified electrician.
Ok, with all the warnings and caveats out of the way, here are logical diagram examples of various bonding methods:

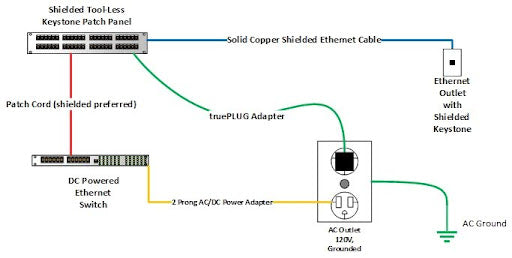
Method #1 makes use of the truePLUG bonding and grounding extension adapter in conjunction with the Ethernet switch AC ground and shielded patch cords. This provides two bonds to ground at the switch side. At the remote wall mounted keystone jack, a shielded patch cord should also be used to the destination powered device to increase the number of bond points to your AC system ground to three.

Method #2 makes use of DIY stranded copper bond wire attached to the center screw of a 3 prong outlet. In the case of AC powered switches this creates two points of bond to ground. With DC powered switches this creates a single point of bond to ground. At the remote wall mounted keystone jack, a shielded patch cord should also be used to the destination powered device to increase the number of bond points to your AC system ground to two or three depending on your switch. See further below for guidance on creating your own DIY bond wire if you cannot purchase a truePLUG adapter. It is important to stress that the bond via the third screw on an AC outlet is not as electrically sound as using truePLUG as the path to ground will have higher resistance.
Method #3 makes use of the truePLUG bonding and grounding extension adapter in addition to any strategically placed shielded patch cords you can get away with. This provides one (very effective) bond to ground at the switch side. At the remote wall mounted keystone jack, a shielded patch cord should also be used to the destination powered device to increase the number of bond points to your AC system ground to two if you can!
Shielded patch panels come with a laughably short bond wire, typically 14 AWG and only about 10 inches. If the shielded patch panel is mounted in a rack with a rack busbar then this is not an issue, but residential installations don’t typically involve racks, much less fancy and expensive rack busbars. So, that is why trueCABLE developed our Ethernet grounding adapter (truePLUG). That said, in a pinch you can create your own as used in diagram #2 above.
Pick up the following items from your local Home Depot or similar store:
You might wish to pick up a ring terminal variety pack from Amazon or some other retailer. That way you won’t be making 50 trips to Home Depot or Lowes.
Follow this procedure:
Let’s address some common questions and give some tips that will help you.
Yes. But, what you likely mean is do you bond both ends of a shielded cable. Don’t get bonding and grounding confused! There is only one very rare circumstance where you might have to bond to ground at a single end only, and that is to avoid a ground loop. If you are running shielded Ethernet between two structures that have their own separate AC systems or separate grounding rods installed, then you should worry about what is known as a ground loop. A ground loop occurs when you have actual conflicting AC ground systems. Merely bonding your Ethernet cable at multiple points to the same AC grounding system in a single structure does not create ground loops. Think in terms of ground rods. How many ground rods are involved?” How To Fix a Ground Loop is a good resource to read more about this topic.
For single structure Ethernet installations, you want to bond your cable shields to your single AC ground at as many points as possible. The more bonds to ground the better the shield will function.This is known as a floating cable shield. That means the Ethernet cable shield is not able to drain off EMI/RFI/ESD to your ground system. You probably won’t have any problems at all, as most residential situations don’t have large sources of EMI/RFI to cause a big enough issue with a floating cable shield. By not bonding your shields to ground you just wasted money and your shielded cable is not actually shielded anymore. Now, there is the slight possibility you will encounter actual trouble by not bonding those cable shields to ground and this can show up as lower than expected speeds or even an ESD event that could damage equipment.
If you are considering installation of shielded Ethernet cable and are unable or unwilling to bond the cable shields to ground then opt for unshielded Ethernet cable for your installation. You will save money and headaches.STP cable is shielded cable, and the term is often used generically. Whether we are talking about S/FTP, S/FTP, F/FTP, or F/UTP the method is largely identical, even if the cable types are not built precisely the same. What varies is the specific termination procedure for the cable in question.
Absolutely! Our shielded 24 port patch panel is known as a multimedia A/V modular patch panel. Obviously any unshielded Ethernet cable and associated hardware will not be bonded to ground as it does not need to be, but it does not hurt at all. In fact if you wish to use the shielded 24 port patch panel exclusively with unshielded Ethernet cable and keystone jacks that is also fine and you don’t even need to bond the panel to ground. If you wish to mix and match shielded with unshielded, the only requirement is you must bond the panel to ground using one of the methods shown above as if all of your cable is shielded.
So, there you have it. A subject that has been the source of many questions and anxiety for residential installers finally explained in one spot. With that, I will say…
HAPPY NETWORKING!!
trueCABLE presents the information on our website, including the “Cable Academy” blog and live chat support, as a service to our customers and other visitors to our website subject to our website terms and conditions. While the information on this website is about data networking and electrical issues, it is not professional advice and any reliance on such material is at your own risk.


I really enjoy your education written articles and videos. I am running Cat6a F/UTP to a separate building on my residential property. I will install a switch to ground the cat6a. I will be connecting my ethernet equipment as follows – Modem -> Router -> Switch. I noticed that switch's can operate on a different Layer (OSI Model). Which type of switch with ground should I use L1, L2, or L3?